No more transition boilerplate. Just provide data, templates, and semantic events to get an experiment running.
// Configure our experiment with our experimental structure and DOM templates
var experimentRunnerView = new Tribulations.ExperimentRunnerView({
  experimentStructure: myExperimentalStructure
  subviewClasses: [ConditionSectionView, BlockSectionView, TrialSectionView]
  regionElement: "#experiment-region"
  template: "#runner-template"
});

// Begin the experiment!
App.mainRegion.show(experimentRunnerView);
When should I use Tribulations?
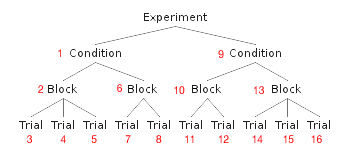
You should use Tribulations when your experimental design can be expressed by depth-first search of a tree. For example, consider evaluating the performance of conditions. In each condition, there are multiple blocks, and in each block, there are multiple trials.
Aside from the assumption that your experimental structure follows a tree with leaves at equal depth, Tribulations makes no assumptions about the content of your experiment.
Dependencies
Tribulations uses Marionette, a popular Javascript MV* framework built on Backbone.js.
Demo
This demo illustrates a simple experiment in which the user is asked to click on numbers. In the tutorial, we'll later see that the code for the demo has no transition boilerplate code.
var EXPERIMENT = {
  firstCondition: [
    [1, 2, 3],  // first block and three trials
    [4, 5],     // second block and two trials
    [6]        // etc.
  ],
  secondCondition: [
    [7, 8, 9],
    [8, 7]
  ]
};
Usage
Tribulations exports two classes:
Tribulations.ExperimentRunnerView: renders the views in order according to the provided experimental structure, subclassesMarionette.LayoutTribulations.Node: a node object for constructing a tree, subclassesBackbone.Modeland expects two relevant properties:innerModelandchildren
NOTE: This documentation assumes some knowledge of Marionette.
Tutorial
You should provide your own experimental structure, but in the tutorial below, we will use a simple experiment with three levels of the experimental tree: conditions, blocks, and trials.
Experimental Structure
Suppose we have the following experiment, where users are asked to click numbers under various conditions:
var EXPERIMENT = {
  firstCondition: [
    [1, 2, 3],  // first block and three trials
    [4, 5],     // second block and two trials
    [6]        // etc.
  ],
  secondCondition: [
    [7, 8, 9],
    [8, 7]
  ]
};
Scaffolding
1. Create view classes and templates for each level of the tree.
These classes should be subclasses of Marionette.View for each level of the experimental tree. (Recall that in Javascript MV* frameworks, views are actually more akin to the controllers of traditional MVC, containing more application logic).
// helper for click events
var endOnClickEvents = {
    click: function() {
        // Helper: triggers an event for the end of an experimental section
        this.trigger("runner:sectionEnd");
    }
};

// Marionette views
var ConditionView = Marionette.ItemView.extend({
    template: "#condition-template",
    events: endOnClickEvents
});

var BlockView = Marionette.ItemView.extend({
    template: "#block-template",
    events: endOnClickEvents
});

var TrialView = Marionette.ItemView.extend({
    template: "#trial-template",
    events: endOnClickEvents
});

// our model
var NumberTask = Backbone.Model.extend({
    initialize: function() {
      // do something interesting with this model
    }
});
<!-- Marionette templates -->
<script id="runner-template" type="text/html">
  <div id="experiment-region" class="experiment-region"></div>
</script>

<script id="condition-template" type="text/html">
  Include instructions for the conditions here.
</script>

<script id="block-template" type="text/html">
  Include your block level text here.
</script>

<script id="trial-template" type="text/html">
  <%- number %>  <!-- access the number passed down from the model -->
</script>
2. Convert the experimental structure into a tree.
Instantiate Tribulations.NodeModel objects (nodes containing model objects) optionally passing down an innerModel model (JSON or Backbone.Model) and setting children that will eventually be rendered in the view. Be careful, as this section will different drastically depending on the experiment.
// Create a tree from the experimental structure using Tribulations.Node
var root = new Tribulations.NodeModel();

// Set the children of the root node to our tree, with
// conditions at the top level
root.set("children", _.map(EXPERIMENT, function(value, key) {
    var conditionName = key;
    var blocks = value;
    var conditionNode = new Tribulations.NodeModel({
        innerModel: { name: conditionName }
    });

    // In each condition, create nodes for the blocks
    conditionNode.set("children", _.map(blocks, function(currentBlock) {
        var blockNode = new Tribulations.NodeModel({
            // no innerModel, since it has no metadata

            // Add each trial to the node for the current block
            children: _.map(currentBlock, function(trialDigit) {
                return new Tribulations.NodeModel({
                    innerModel: new NumberTask({ number: trialDigit })
                });
            })
        });

        return blockNode;
    }));

    return conditionNode;
}));
3. Create a DOM element for the experiment.
The name of the template and the region can be anything -- they will be passed into a view later.
<script id="runner-template" type="text/html">
  <div id="#experiment-region">
  </div>
</script>
4. Run the experiment
Initialize a Tribulations.ExperimentRunnerView with your experimental structure. Once you show this view in Marionette, the experiment will begin.
var experimentRunnerView = new Tribulations.ExperimentRunnerView({
    experimentStructure: experimentStructure
    subviewClasses: [ConditionView, BlockView, TrialView],
    regionElement: "#experiment-region"
    template: "#runner-template"
});

// Starts the experiment on the first condition
App.mainRegion.show(experimentRunnerView);
Events
Listen to runner:experimentEnd on Tribulations.ExperimentRunnerView to perform an action when the experiment has finished.
experimentRunnerView.on("runner:experimentEnd", function() {
  alert("experiment finished!");
});
Within one of your subview classes, you can trigger runner:sectionEnd to indicate the end of a section (a trial, a block, etc.).
var TrialView = Marionette.ItemView.extend({
    events: {
      "click #my-button": function() {
        // this trial is over when user clicks the button
        this.trigger("runner:sectionEnd");
      }
    }
});
Model and Metadata in Subviews
Any view shown by Tribulations.ExperimentRunnerView has access to useful metadata about its associated node through this.options.metadata.
var TrialView = Marionette.ItemView.extend({
    template: "#trial-template",
    onRender: function() {
      // the innerModel associated with the node
      console.log(this.model);

      // whether this is the first or last sibling in the current branch
      // useful for skipping unnecessary breaks (i.e. no break needed at
      // the beginning of an experiment or sending data at the end
      console.log(this.metadata.isFirstSibling);
      console.log(this.metadata.isLastSibling);

      // the number of child nodes
      console.log(this.metadata.numChildren);

      // the "state" of the experiment
      // i.e. [0, 0, 1] would be the first condition, first block, second trial
      console.log(this.metadata.state)
    }
});